


Aim: Tighten up my approach to creating very specific artwork. Social media work is generally a brief with no wiggle room demanding something very particular in a narrow way. It’s good for me to impose more organisation on what I make, I’m a bit loosey goosey but know that I can make some cracking pieces if my mind is applied correctly.
Workflow
Haaland drawn in Procreate using studio pen to mimic vector crispness.
Layout designed in Adobe Illustrator.
Haaland artwork tweaked in Adobe Photoshop and then integrated.
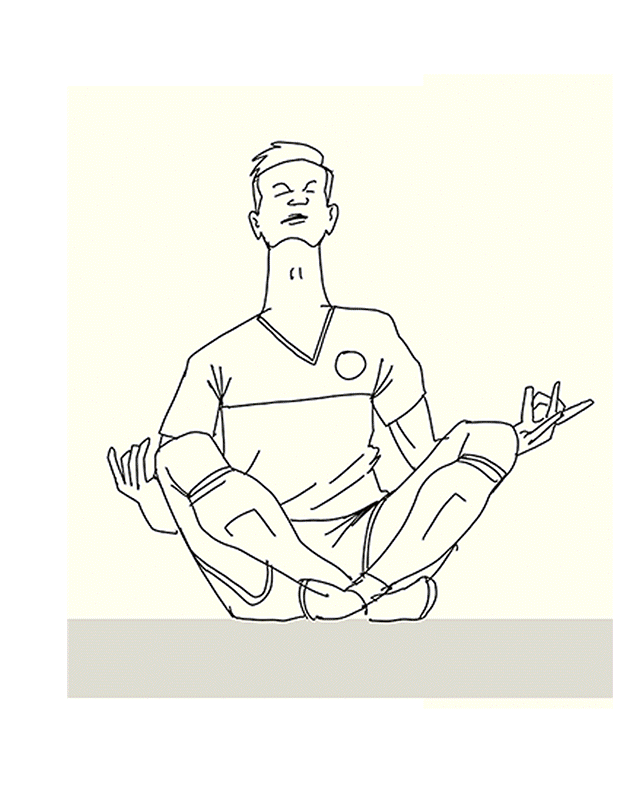
I try to reference a player in more ways than just portraying them in action. I picked Erling Haaland as the subject and used his famous meditation celebration as the pose. To further use elements of his personal brand later on in the development I added zen calm radiating from his head to contrast an array of microphones which represent his odd approach to the post match interview.

The first sketch is terrible, sometimes the initial scratchings are decent but this is not (I always actively want to give up when things are bad at the start but I always push through these doubts). I then start to draw fast and loose over the first image to capture some energy and make sure the proportions and layout of the body are acceptable. I carry this step out a few more times and then commit to final refined piece.

The player artwork process also happens with the layout, I sketch it out rough to get a broad sense of what goes where. I have a list of things to include; player name, player artwork, tagline, room for logos. I don’t overthink it. The rough layout sketch is placed in Adobe Illustrator and I design some form of organisation over it. I designed everything within a 4:5 grid for optimum posting size to Twitter and Instagram. When I’m happy I place the coloured artwork into the piece and tweak anything that needs adjustment.
The benefits of vector dictate that I need to be using that medium in my work, I think it fits my thought process in any case. I like slotting pieces together and having the ability to alter details over a few days to get the balance just right. The main struggle here is allying the energy of my work with the clean tools of Adobe Illustrator, the program I use for vector. The crisp type I created for ‘HAALAND‘ would not have been easily made in my usual drawing programs, Procreate and Photoshop.
I feel it’s important to point out here; I follow my gut with 90% of my decisions and the remaining 10% are dictated by the requirements of the piece. I’m a big believer in studying illustration and design to sharpen up my knowledge but when actually making a piece, thinking can get in the way. I’ve digested enough knowledge to trust my gut to know how to deploy it.

The leap between the black rough scraggly ‘Haaland‘ above to the crisp vector version beside it was carried out without thinking. I’m not knowledgeable about type and when approaching this I would aim for something solid with no frills so I don’t fall flat on my design face. That meant I’d line up a grid and draw the letters with boxes, the flourish came with making each shape multiply and that gave me a nice warmer yellow at the intersection points. I feel like I fluked my way into it but I’m quite happy with the final result.

The next step is to take a few days and keep trying things to get the most impact out of the piece. It’s 99% blind alleys but there’s usually a kernel of potential which blossoms after a few days of squinting sideways at the screen.

Here’s a collection of tweaks made after a day away from looking at the piece. They all hold some version of the promise I feel the overall piece has. As you can see from below I settled on the final option. Although I liked the teal gradient in the background it significantly lowered the impact of the yellow and black against the white. Somehow the grid in the background helped lend a feeling of organisation to the piece, even if it was just a crutch for my mind. I’m treating this as a victory. Things are edging closer to my work being what I want, there’s no greater satisfaction.

Here’s a step by step of the entire process in gif form.

The artwork is available as an A3 print from danleydon.shop